Dec 15, 2011

Vegan Christmas Tree Pastries

These tree-shaped pastries are easy and fun to make, and inspired by a post that has stuck in my head for a couple of years from VeganLovlie.  She used homemade pie crust pastry, but I went the quick route and used store-bought puff pastry.  Each package makes four 4-6" trees (more if you try making smaller ones), and you can fill them with anything you like- savory or sweet.


Start with your sheet of puff pastry and cut in half.  Then make two 1 to 1 1/2" cuts on the middle bottom for your tree trunk.  Then carefully score the outline of the tree (triangle) without cutting all the way through.  Trim the upper corners so you don't have too much dough to work with (use scraps for something else), then trim the bottom corners too.  Lastly, cut strips on either side of the tree- not an exact science, but about 1/2" each, stopping at your scored guide lines.


I added a layer of Tofutti cream cheese mixed with garlic salt, dried basil, and cracked black pepper, to make an herb spread.


Then I added a layer of a saute- spinach, onions, sun-dried tomatoes, and roasted pine nuts- sauteed in a little olive oil and seasoned with salt and pepper.  Make sure this mixture is not wet!


Starting from the top, simply fold each strip towards the center, overlapping one side, then the other side.  Wrap firmly over your filling.


When you get to the last two side strips, fold up the two bottom corners.  You may want to trim these a bit if it seems like too much dough.  Then go ahead and finish the two remaining side strips, tucking the last one under a bit.


Place it on a prepared baking sheet (I used parchment paper), and bake at 400 degrees for about 10 minutes.  Then broil the tops for a minute or two- watch it until it turns golden and puffs up. Let them cool a bit before picking them up with your hands. 


Nov 24, 2011

Turkeys on My Vegan Table!

Turkey Apple, made of green apple, carrots, celery, and raisins (for eyes)  Parts held together with toothpicks
Who says vegans don't have turkey on Thanksgiving?  


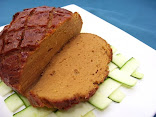
Turkey Bread Bowl with Spinach Dip (eyes made of black peppercorns)

Since I've been pregnant and battling bronchitis for the past week and a half, I am seriously late to the game!  But I thought I'd have a little fun anyway...


Happy Thanksgiving Everyone!
Gobble, Gobble!

Oct 31, 2011

Halloween 2011: Alien Invasion!

As some of you may know, Halloween is the biggest holiday at my house.  As an owner of a DJ company, it's a perfect fit for our equipment, and it gives us the opportunity to connect with all the trick-or-treating families in our neighborhood (more than a hundred kids usually stop by).  They always look forward to our "getup" every year, and cars passing by during the day will often linger to check out our progress and ask us what movie we'll be showing.


Over the years, we've continued to outdo ourselves, and this year was our most complicated theme yet... aliens.  I've been wanting to do this theme for a few years now, and had finally committed to it a couple months out.  Little did I know that there was little in the way of store-bought items that followed our theme... plenty of ghouls, witches, and skeletons... but no aliens.  So with the support and help of the family, friends, and crew, we set out to create most everything ourselves.


Above is the very ambitious alien (from the movie Alien) that I made out of mostly recycled materials.  As the story goes, the Alien takes on some of the characteristics of its "host," and we jokingly referred to him as the Snowboarder Alien because he was formed from a reclaimed snowboarder helmet.  I really wanted to throw him out the window a few times, as it was difficult to figure out how to keep his head up structurally... luckily we had plenty of duct tape (thanks, Mark)!


To finish my alien, I used the paper mache technique from last year's Halloween for the head and torso, then made him silver, and painted on some details.  Plastic tubing from the hardware store finished off the look, and we even hooked up his "inner  mouth" to one of our fog machines, which turned out cool!

Our house on Halloween is usually set up with a tunnel-like entrance in the front, with decorations on the side (we're on a corner), interior "haunted house" structure that has expanded into three sections due to our new patio addition, and a 6 X 9 foot movie screen out front to show movies (we're video DJs).  With our special effects lighting, fog, and sound effects- it gets pretty crazy and impressive.  Our neighbor Gary from across the street supplies us every year with free pumpkins from the UC Davis Veg Crops fields, and can be spotted sitting on his lawn chair in his driveway to watch our movies on Halloween night.  
My husband, Mike made the awesome cyborg on the "launch pad" at the front entrance, Mark and Peter made cool UFO's out of old dog igloos, and Levon and the crew helped set up all the walls, audio/visual, and even carved a pumpkin or two!  Thanks, Cee for making awesome food- because we were about to forget about eating that day!


Here's a quick video I put together for you to see:


Yes, it's a hell of a lot of work, but in the end, there is one word that can describe this night... magic.


Little ones (and sometimes not so little ones), walking clumsily, yet proudly in their elaborate little outfits, are enthusiastically coaxed by parents to enter the scary tunnel.  Ninjas, princesses, and medieval knights huddle together as they warily walk through the fog, fake fire, and glow-in-the-dark lights towards their ultimate goal... candy.  Bravely they face their fears of unseen terror that may await inside- is that a monster? Will it get me?  Finally they're greeted by a lady in a funky space suit with funny goggles, carrying a basket full of treats!  As long as it's not her friend dressed up as a very convincing werewolf, they rush forward with their cute little voices...
"Trick or treat!  Trick or treat!"  
"What do you say?" ask the responsible adults behind them.
"Thank you!  Thank you!"

...Ah, the memories of being a kid on Halloween.

Oct 9, 2011

A Bun in the Oven

Yes, it's true.  I have one- in my oven, so to speak!  Surprise!  Although this baby was completely unplanned, and such a mystery as to how it happened, we are all thrilled.  Admittedly, the idea of a child did give my husband and I a freak-out moment or two when we first saw the plus sign on the, count 'em- THREE pregnancy tests, but I knew that this had to be destiny.  Only a month or so earlier, quite an unusual thought entered my mind, which I shared with Mike.  You see, I had never really longed for children like many women do- never felt the biological clock ticking or anything like that, and was perfectly content with the thought of being a childless couple.  But out of the blue, I told Mike that if we ever got pregnant, I would want to have it no matter what.  Although that statement was quickly followed by a don't-hold-your-breath-though disclaimer, it seems in hindsight a very interesting premonition.  


So here we are at the beginning of my 2nd trimester, and I have to tell you- my relationship with food has changed.  As expected, odd cravings and repulsions, along with feeling constantly and annoyingly... pukey, my motivations in the kitchen have been somewhat limited to eating foods that are quick to prepare, and (hopefully) easy to keep down.  One of my few wierd repulsions include anything with cinnamon.  This is undoubtedly a terrible time of the year to hate cinnamon, but there it is.  


These sticky buns would most likely make the most amazing cinnamon rolls, if you want to add a couple teaspoons of the stuff (yuck!)... but for my present state of pukeyness, I am omitting.


Side note:  leftover dough can also make a cute bear.  Can you tell that I feel like it's going to be a boy?
...We'll see...
Maple Pecan (Un-Cinnamon) Sticky Buns

Ingredients:
(Makes 12-18 buns)

Dough:
2 1/4 tsp. dry active yeast (1 package)
1/3 C. + 1 tsp. sugar
1/2 C. lukewarm water
3/4 C. non-dairy milk (I used soymilk)
6 T. canola oil
1/4 C. Vegenaise
1/4 tsp. salt
31/2 - 4 C. white spelt flour (or all purpose)

Filling:
1/4 C. brown sugar
1/4 C. sugar
1/4 C. spelt (or all purpose) flour
1/2 C. crushed pecans
1/2 C. raisins
2 T. Earth Balance margarine (chilled)

Icing:
1 C. powdered sugar
1/4 C. maple syrup
2 T. melted EB margarine
1/2 tsp. vanilla extract

Spinz:

In a large mixing bowl, add yeast to the lukewarm water and 1 tsp. of sugar.  Allow it to sit until frothy.  Add non dairy milk, canola oil, Vegenaise, and salt, and whisk together until combined.  Add flour a little at a time until a dough forms.  Add a little more if the dough is sticky- it should become a smooth elastic dough that doesn't stick to the sides of the bowl.  Knead for about 5 minutes.  Cover and set aside to double in size (about an hour).  

For the filling, mix all the ingredients except the margarine, until well combined.  Set aside.  After the dough has finished proofing, punch down and roll out onto a floured surface with a rolling pin until about 1/2" thick.  Sprinkle filling evenly over dough, then cut little pieces of margarine to dot the dough.  Roll carefully and as tightly as possible.  Press to close the end, and cut into 12 even buns.  

Arrange the buns in a prepared baking pan (they can be pretty snug, but remember that they will expand).  Cover, and let sit for another 30 minutes.  Bake at 350 degrees for 10-15 minutes.  Keep an eye on them, as oven temps can vary.  You want the bottoms to be golden, and the tops firm to the touch.  

For the icing, whisk all ingredients together until combined.  Drizzle over warm buns. 

Best when served warm and fresh!


NOTE: You can also freeze the raw roll, thaw, and bake later or refrigerate and bake a few days later.

Ultrasound at 14 weeks... amazing how the little sucker was moving around!  Not so clear in the picture, but we could see the spine, arms and legs, and little heart beating.  We could've watched for hours.


Sep 6, 2011

Vegan Bahn Mi (Vietnamese Sandwich) with Spicy Cashew Spread

I've always loved these Asian-French fusion sandwiches.  I usually use vegan mayo, but I thought I'd get a little fancy with a jalapeno cashew spread, that has the consistency of hummus.  If you've never tried one of these, they're savory, sweet, sour, and spicy, with a fresh crunch from the veggies.  These disappeared quickly! 


Ingredients:


For the mushrooms:

3-4 Tbsp. extra virgin olive oil
1/2 pound portabello mushrooms (two large caps)
3 Tbsp. soy sauce
1 Tbsp. brown sugar
1 Tbsp. Mirin or Sweet Rice Wine
pinch of black pepper

For the spread*:
1 1/3 cup raw cashews
1/4 cup sliced pickled jalapenos (you can use fresh, but may need to up the salt)
2 cloves garlic
2 1/2 Tbsp. Mezzetta Extra Virgin Olive Oil
1 Tbsp. lemon juice
1/2 tsp. salt (or to taste)
1/4 cup water (or more)
*This makes much more than you'll need, but you use leftovers to spread on crackers or other things

To finish:
1/2 cup torn fresh cilantro
Thinly sliced cucumber (6-10 slices per sandwich)

crusty sweet French bread (enough for two sandwiches)

Spinz:

1.  Soak raw cashews in hot water, set aside for later
2. Clean mushrooms and trim stems as needed, cutting into 1/2" slices
3.  Add the 3-4 tablespoons of extra virgin olive oil into a large hot skillet, then saute the mushrooms until tender and golden on the edges.  Make sure not to crowd the pan- do two batches if needed.  Remove mushrooms from the pan and set aside.
4.  To the same pan, turn off heat and add the soy sauce, brown sugar, mirin, and black pepper.  Stir quickly until thick and  bubbly, scraping up any mushroom bits.  
5.  Pour sauce over mushrooms and toss, then set aside to let cool down and let flavors meld.
6.  Tear up the fresh cilantro and slice cucumbers, set aside
7.  Drain the raw cashews (soaked for 20-30 minutes) and put into a food processor.  Add the crushed garlic, 2 1/2 tablespoons extra virgin olive oil, lemon juice, salt, and water.  Add more water by the tablespoon if needed and puree until creamy and hummus-like.  Add jalapeno peppers and pulse until small chunks are well incorporated into the spread.
8.  Assemble sandwiches:  Split two  6" or so pieces of french bread, leaving one side attached.  Spread the spicy cashew spread onto entire interior of the bread.  Spoon on marinated mushrooms, then layer cucumbers, pickled carrots  and a sprinkling of fresh cilantro.  Close and eat.

Jul 31, 2011

FoodBuzz 24 x 24: Incredible Edible Bowls

Put away those utensils and leave your bowls in the cupboard!  If you ever wished you could
lick your bowl clean, well... here's your chance to EAT it!  Martha Stewart wouldn't raise an
eyebrow on these babies.


Cucumber Sailboats 
Tip:  Make sure to cut the bottoms so they'll stand up.
Tip#2:  Nothing better than fresh fried tortilla chip sails!  Fry up scraps for tortilla soup or add 
to salads.  These were filled with guacamole and accented with red bell pepper.

Carrot Straws & Apple or Bell Pepper Cups 

These are the most fun, child-like things you'll ever see (which is why they make me happy)!  I 
think it's healthy for adults to regress a bit, but you can always say you're making them for 
your kids (I won't tell).  Of course, if you don't have any kids in your life, you'll need to have 
the maturity to handle people teasing you a bit.  My advice?  Start drinking through a carrot 
straw, and see just how much they want one too!

To Make A Carrot Straw:
You'll need a nice straight carrot that's at least 1/2 - 3/4" thick at the top, a standard vegetable 
peeler, a sharp knife, and a 1/8" flathead screwdriver that's at least 4" long (it's skinnier than a 
standard one, which reduces the chance of cracking).


Step 1:  Cut the top and narrow end off the carrot, leaving a 3-4" long section, unpeeled.
Step 2:  Make sure that both ends are level by standing them up on your cutting board- trim as 
needed.
Step 3:  Hold the wide end as the base, while you twist the screwdriver into the top end of the 
carrot, making sure to keep it straight and centered.
Step 4:  When you're about half way through, turn upside down and twist from the fat end.  It 
should easily poke through, and you can push out any carrot bits left.  Run water through to 
make sure.
Step 5:  Now peel your carrot and from the fat end, start to whittle away until you have a 
straight narrowed-down straw, using the hole as your guide.  Don't whittle too much!


Tip:  Make sure to thoroughly clean your screwdriver before using.


Bell Pepper Cups 
Ok, I'll try and be an adult now... Bloody Mary, anyone?

Potato Chip Flower Bowls

Be careful- these are as addictive as you'd think!

Start with a long wooden skewer, and use a small cube of potato as the base.  Cut a small 
potato (1 1/2 - 2" in diameter) into thin slices- a mandolin works best for this.  Cut a slit about 
halfway into your "petal."  Cross the two corners as shown to create a petal, then skewer.
Repeat a couple more times, until you get...
... this.  Then carefully deep fry them by holding the opposite end of the skewer and 
submerging the flower in the hot oil until golden and crisp.  
Add a little spoonful of Tofutti cream cheese, mixed with chives, garlic powder, and salt into 
the center of the flower, then skewer a small cherry tomato or whatever you like to finish.  
These are perfect little bites.  I also made yam flowers (right).

Potpie Pastry Spoons
You can go crazy with these- savory or sweet.

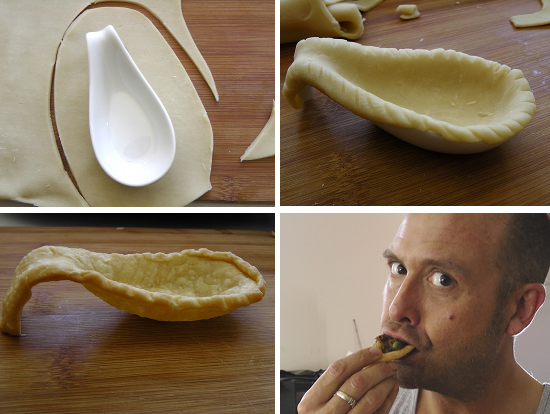
Use ceramic spoons, bake at 350 F for about 15 minutes or until golden.  Let cool a bit before 
trying to remove the spoon.  I filled mine with carrots, pees, leeks, and store-bought sausage, 
sauteed in gravy- everything finely diced.  Mark sampled... "Yummy!"

Candied Orange Bowls 

I used the technique found at Food2 to make candied orange halves, which I would later fill 
with a roasted almond date crust and a no-bake cheesecake.  Everything went well together- 
the sweet tanginess of the candied orange, the nutty sweetness of the inner crust, and the rich 
creaminess of the filling. 
Use organic oranges for this.  Cut in
half from stem to bottom, removing
any stems.  With a small paring knife,
cut around the fruit like you would a
grapefruit.  Using a spoon or fingers,
carefully dig out the fruit over a bowl
to catch the juice.  Scrape out any re-
maining fruit, leaving a thin layer of
pith and the skin.
You'll need a large pot, plus:
6 small oranges, less if they're big
4 1/2 C. granulated sugar
1 1/2 C. water

First, blanch them by putting them into the pot with enough water to cover.  Bring to a boil, then pour off the water.  Repeat this two more times (total of three times) to get rid of a lot of the bitterness from the pith.  
Now mix together the sugar and 1 1/2 cups of water in the big pot, and bring to a simmer.  Let simmer for 8-10 minutes, or until the temperature reaches 235 degrees F (soft ball stage).  Do not stir.  It should be thick and syrupy and slightly brown.
Carefully add the orange cups, and coat each one gently with tongs- too much agitation will cause sugar crystals and you don't want that!  
Let them simmer for about 45 minutes or until they look translucent.  Drain each one, and lay on parchment paper to dry- may take 5 hours or more.
Candied Orange Cheesecake Bites
Slice it up like an orange, and serve!  Tip:  Use a sharp knife, and clean it after every cut.

Less dishes in the sink- always a good thing!

Jul 26, 2011

Vegan Salami, Using Tapioca Pearls


I read somewhere that a chef used tapioca pearls in a dish to mimic fat.  Intrigued, I delved a little deeper into the subject, and found that vegans were already using them in seitan to improve texture.  I also found that you must use instant tapioca, so that it would actually cook through properly.  The tiny beads are barely recognizable in this, but I think it does add more softness and a little "bounce" to the texture.  Also, it does mimic the fat left on the tongue after eating salami.

This recipe tastes A LOT like salami, and slices thin (not paper thin, but pretty thin)!  

Ingredients:
1 C. celery, chopped
1 C. yellow onion, chopped
pinch of salt to saute
-----------------------------------
3/4 C. water
2 cloves garlic
1/4 C. soy sauce or tamari
1/2 tsp. salt
2 tsp. liquid smoke
3 T. tomato paste (can substitute with ketchup)
2/3 C. nutritional yeast flakes
1 tsp. fennel seeds
1 T. smoked paprika
2 T. extra virgin olive oil
-----------------------------------
1/2 C. minute tapioca pearls
2 tsp. whole black peppercorns (or cracked if you prefer)
2 C. vital wheat gluten

Spinz:
Without any oil, saute the celery and onion with the pinch of salt in a non-stick skillet until tender.  

Transfer to a food processor with water, garlic, soy sauce, salt, liquid smoke, tomato paste, nutritional yeast, fennel, paprika, and olive oil.  Blend until pretty smooth (no big chunks).  

In a mixing bowl, mix tapioca pearls, peppercorns, and wheat gluten.  Add the wet mixture and mix until it becomes a stiff dough.  Get your hands in there and knead it until everything is well incorporated.  Roll into a couple of tubes and wrap tightly in aluminum foil.  Steam or pressure cook until firm (about 45 minutes) with indirect water.  (Optional for dryer texture) Remove from foil, brush with olive oil, and bake for 30 minutes in the oven, turning mid-way through.  Let cool a bit before cutting.

Jul 21, 2011

Super Quick No Yeast Crispy Chewy Pizza Crust!

When I crave pizza, I usually think about how long it'll take to make the dough, then end up making something else.  This flavorful dough takes no time at all to make (no resting required), and contains no yeast.  When baked correctly, it's crispy on the outside, and chewy on the inside- just like what a good pizza crust should be.  If you don't have a pizza stone or special pan, no worries- this method will make you a pizza hero!


Here's the recipe.  Take special note to the method (or spinz), as it will mean the difference between a tough soggy dough, and the one shown above!


Makes two large crusts
Ingredients:


2 3/4 C. white spelt flour 
2 C. all purpose flour (or you can use your own preferred mix of flours)
1 tsp. baking powder
1/3 C. nutritional yeast
2 T. ground flaxseed
1 tsp. salt
1 T. sugar
1 tsp. dried basil (or Italian seasonings)
1 tsp. garlic powder
1 C. water


Spinz:
Heat oven to 400 degrees F.  Mix up everything except water in a large bowl.  Add water, and mix and knead into a smooth elastic dough.  If it's too sticky, add a little flour.  If it's too dry, add a little water.  Divide into two equal dough balls.  Flour your work surface generously with flour, and sprinkle some onto your dough.  Roll it out until thin, then fold up the dough 3-4 times (this adds layers, much like a puff pastry).  Dust with more flour as needed, then roll out again until very thin.  Transfer dough to a prepared baking pan (I sprayed mine with oil to keep from sticking and sprinkled some corn meal).  Poke the dough with a fork evenly throughout the dough and brush with a little olive oil.  Place pan on center rack, and turn the oven to broil.  This will only take a few minutes (depending on your oven), and you should watch it closely so it doesn't burn.  Ideally, it should look bubbly and slightly browned (maybe even more than shown below).  The dough should be cooked through and stiff, but not crisp.  


Take out of oven and flip the crust over. Add a thin layer of sauce and toppings.  Don't pile on too much or it will be too heavy for the crust.  The crust should have cooled down enough to handle by now, so lift it out of the pan with a large spatula and hands and quickly transfer directly to your oven rack.  Broil the pizza until cheese is bubbling, and the edges are golden.  Again, keep a close watch on it, as it should only take a few minutes.


If you have a pizza stone, or one of those perforated pizza pans, then by all means use it.  I would recommend sliding the dough onto one of these hot surfaces for best results, and you probably won't need to flip it.  


Also check the bottom of the pizza- it should sound crispy when you tap it.

Jul 14, 2011

Chocolate Mint Plant, Candied Mint Leaves


A few months ago, I stumbled upon one of these mint varieties at a supermarket, and had to have it!  It smells (and tastes) like chocolate mint- no kidding!  Unlike regular mint, it's less fibrous and the texture reminds me more of basil.  Luckily, after planting it in my herb garden, it grew beautifully.  


So I decided to make candied (or sugared) mint leaves, which is typically done with egg whites.  I found that using ground flaxseeds and water (flax eggs) worked well.  I also put my raw sugar into my Magic Bullet to make it into a fine powder.  You could also use a spice or coffee grinder for this.
Tips:  Dip the leaves in the sticky flax mixture, then squeeze off excess with your fingers so it won't be too clumpy.  Then sprinkle sugar evenly over leaf (front and back), and shake off excess.  Put leaves on a drying rack for a few hours, or until they're hardened.


Here are the finished leaves.  They taste like chocolate mint candy, and they're perfect for...


...Ice cream!

Jul 11, 2011

Collard Green Dolmas and Sushi

We had a bumper crop of collard greens this year, which we allowed to grow into what seemed like small trees.  And although I love me a big bowl o' greens, I thought I'd do something more creative with them.  I've been wanting to make dolmas for awhile now, and when cooked, collard greens make a good substitute for grape leaves.  These are easy and fun to make, and a great chilled summer dish, served with a dill yogurt sauce or tzatziki.

Dolmas are traditionally made with a rice base, mixed with a variety of spices, veggies, dried fruits, and sometimes meat, then they are wrapped in blanched grape leaves (or the kind you'll find in jars at the store).  Really, you can put whatever you like in these.  Mine had rice, seasoned tempeh, parsley, red onion, dried cranberries, and shredded beets.  Everyone gobbled them up.

The Filling: starts with 3 cups of cooked rice (I used a medium grain jasmine mix).  Then crumble a package of tempeh into a heated skillet with a thin layer of olive oil.  Let the tempeh brown, then add seasonings, salt, and a couple tablespoons of nutritional yeast.  Stir.  Pour in 1/2 cup of water and cover to let steam out.  Add this to the mix, then add 1/2 cup finely chopped red onion, 1/2 cup chopped parsley, 1/2 C. dried cranberries, and 2-3 tablespoons of vegannaise to help bind everything.  Salt and pepper to taste.

The Collards:  are blanched for 1-2 minutes in boiling water.  They should be pliable and vibrant green.  Take them out, and rinse with cold water to stop the cooking process.  Pat dry with a towel, then cut out the center stem.  Bring the right and left sides of the leaf together, overlapping to make a nice whole piece.  Mix up some lemon oil by using one part lemon juice to one part extra virgin olive oil and a dash of salt. Brush the leaf with this mixture.  Then you're ready to wrap!

To wrap:  simply spoon some of the rice mixture as shown above onto your leaf, and roll up like a burrito.  Brush on more lemon oil on the outside when done.

Note:  I added shredded beets separately to some for variety and color.  They also added a nice flavor that I liked a lot.

Dill "Yogurt" Sauce:  One part silken tofu, one part vegannaise, dried dill, salt, garlic powder, and lemon juice.  Puree until smooth.

You can eat these right away, but they're even better if you let them chill in the fridge overnight.

I also made California sushi rolls with the greens.  I used sushi rice (vinegar, sugar, and sesame oil), pickled carrots, avocado, cucumber, and tofu salad.  These were tasty, but I personally prefer nori (call me a purist).

The collards were also treated with lemon juice before wrapping to balance the bitterness.

One of the "Collard Trees" growing in my garden!