Nov 25, 2010

Super Colossal Vegan Roast

...or more affectionately named "Tofurken."

Thanksgiving. A holiday created by Americans to reflect and appreciate, to spend time with family and celebrate the coming of Autumn and all its beauty. But let's face it- the most important thing about Thanksgiving is THE FOOD. It could be described as an obsession. The one day of the year when an entire nation actually prepares to feast. An elastic wasteband and a cozy chair for napping afterwards is a prerequisite for any guest, but if you're the cook- it's last-minute dashes to the grocery store for forgotten items, mountains of things to chop, and a multi-tasking marathon around the entire kitchen... All for the preparation of a meal that really represents our motto when it comes to Thanksgiving meals- "the bigger, the better!"

Of course, this motto has gotten us into a lot of trouble healthwise, but it's a VEGAN Thanksgiving around here, so what the Hell? In compliance with this motto, I decided to take all of the most popular vegan proteins and put them into one colossal roast!


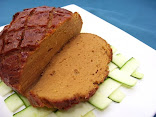
Vegan sausage wrapped in green chard, surrounded by lemon cashew tofu, then wrapped in a chickpea tvp seitan, and topped with tempeh bacon


Ingredients:

Tempeh Bacon
half pkg. WestSoy multi-grain tempeh, sliced thin
4 T. extra virgin olive oil
1 T. soy sauce
pinch of salt
1 T. nutritional yeast
dash of liquid smoke
1 tsp. smoked paprika
1/2 tsp. cayenne pepper
dash of garlic powder


Seitan
1 C. vital wheat gluten
1 C. TVP (textured veg protein granules)
2-3 T. vegetable oil (for saute)
1 C. yellow onion, chopped
2-3 cloves garlic, chopped
1 C. cooked chickpeas
1 C. water
1/3 C. nutritional yeast
1 1/2 tsp. salt
1/2 tsp. pepper
2 tsp. rubbed dried sage
1 1/2 tsp. dried thyme leaves
1 tsp. celery seeds

Tofu
1 14oz. pkg extra firm tofu, pressed and drained
1/2 C. cashew ricotta (or soaked in hot water until softened, then drained)
2 tsp. lemon zest
1 tsp. lemon juice
pinch of garlic powder
salt to taste


Wrapped Sausage
1 pkg (4-pack) Tofurkey Italian sausage, or your favorite sausage
4 large green Swiss chard leaves


Spinz:


Wrap sausage: Blanch chard leaves one by one in a large pot of boiling water for a few seconds until just wilted (too long and they will fall apart easily), then transfer to a bowl of cold water. Lay one leaf on your work surface, patting dry gently with a towel. Use a knife to cut the main stem out, then carefully place the leaves side by side. Starting at one end, roll one sausage in the leaf until completely wrapped. Set aside.
Prepare Tofu: Put all ingredients into a food processor. The mixture should stick together but still have some lumps (not completely smooth). Taste and add more salt if needed. Set aside.
Prepare Seitan: Mix wheat gluten and TVP in a large bowl and set aside. Saute the onions and garlic in 2-3 T. of oil until softened and carmelized. Transfer this to a food processor. Add remaining ingredients to the food processor and blend until fairly smooth (a few chunks are ok). Add wet mixture to the dry until completely incorporated- use your hands to knead a little.
.
Roll Seitan: Lay down a large sheet of plastic wrap, set seitan dough onto wrap, then place another layer on top before rolling out (this makes it easier to roll and assemble). Roll until about 1/4 - 1/2" thick, depending on size needed to encompass the sausages.
Spread Tofu: Remove top layer of plastic wrap (leaving bottom layer). Spread tofu mixture evenly onto the seitan, reserving some to spread in between and on top of the sausages. Do not spread all the way to the edges as shown.
Stack Sausages: Two on the bottom, and two on the top, with a little tofu in the middle.
Finish Tofu: Spread the remaining tofu on top and down the sides of your sausage "tower."
Assemble: Using the edges of the plastic wrap, pull up opposite edges and press the dough together to seal on top. Then press side edges to complete the seal. Make sure to pull it tight and gently squeeze and mold to shape.
Cook: Put the roast onto two layers of aluminum foil and wrap tightly. Steam for 45 minutes- 1 hour or until the surface springs back to the touch.
Add Tempeh: Brush on tempeh marinade on top of cooked seitan roast. Lay tempeh slices on top, then brush with more marinade. Broil in the oven to crisp up the tempeh, or use a torch like I did.

Reviews: I liked it much better than any of the store-bought roasts. Mark (the omnivore) preferred my Tempeh Roulade over this one, and I have to agree, but this one is prettier. Mike slathered it with green bean casserole and was lovin' it.


Update: This roast tastes even more amazing the next day! I would definitely make this again, but a day ahead to reheat later.


Nov 8, 2010

Tempeh Roulade en Croute


Here's how my typical vegan Thanksgiving goes:  
Stuffing- check.  Cranberry sauce- check.  Mashed potatoes, green bean casserole, pumpkin pie- check, check, check.  Vegan turkey substitute... ugh!

Let's face it- side dishes are a breeze, but the tasty proteins that we usually eat may not be as grandiose as we'd like for Thanksgiving. And no self-respecting vegan wants to be shown up by a turkey (although that's happened to me plenty of times).  Sure, I've thrown up my hands before, and declared a big "F" on faux meat! But I realize that giving up so easily is just plain laziness, and a big lack of creativity... that's just not me. I'm the chick that makes her own rocks.

So here's one clever way to make something meaty, with that "wow" factor for your vegan Thanksgiving dinner plate- much better than heating up a frozen pre-made thingy that you bought last minute at the grocery store! 


Ingredients:
1 package tempeh, or multi-grain tempeh*
Marinade for Tempeh:
1 T. extra virgin olive oil
2 tsp. soy sauce or tamari
1/4 tsp. salt
pinch of black pepper, thyme, sage, and celery salt or
1 tsp. poultry seasoning
Stuffing:
2 links of your favorite vegan sausage (I used Tofurkey Italian Style)
1/2 C. yellow onion, finely chopped
1/2 C. carrot, finely chopped
1/2 C. celery, finely chopped
2 cloves of garlic, minced
1/2 C. bread crumbs (I used whole wheat)
1 C. vegetable broth
splash of white wine (optional)
salt to taste
Pastry:
1 1/2 C. all purpose flour
1 tsp. salt
3/4 C. refrigerated vegetable shortening (I used non-hydrogenated)
1/4 C. or more ice cold water
small amount of plain soy creamer for finishing


Spinz:
1. Roll the tempeh.  I used Trader Joe's multi-grain, which crumbled more than I would like, and I think the West Soy brand would hold up better, since it's also easier to slice than the Trader Joe's brand. Update: West Soy is actually more crumbly, so I'm sticking with Trader Joe's brand for now!
Let the tempeh come to room temperature before rolling out.  Spread a piece of plastic wrap under your tempeh.  Press evenly in all directions with a rolling pin to flatten slightly.  Roll to flatten further to about 1/2 inch thickness, being careful not to break the edges.
2. Marinate the tempeh.  Whisk together the marinade ingredients in a small bowl.  With a pastry brush, brush on the mixture evenly over one side of the tempeh.  
3. Cover.  Place another piece of plastic wrap over the tempeh, and refrigerate for at least an hour.
4. Prepare the pastry. Put the flour into a mixing bowl. Using a pastry cutter, cut in the cold shortening until fully incorporated into the flour with pea-sized lumps.  Add cold water gradually, pressing into the dough with mixing spoon.  Use hands to quickly press into a ball. Flatten into an inch-thick disc, wrap in plastic, and refrigerate for at least 30 minutes.
5. Make the sausage stuffing.  Heat a saute pan to medium-high, add 1-2 T. oil.  Saute the onions and carrots for a few minutes (adding salt), then add the celery, garlic, and sausage. Saute until vegetables and sausage are slightly brown on the edges, being careful not to burn the garlic.  Add bread crumbs and seasonings and saute for a couple minutes, then add water and wine and cover until slightly reduced.  The result should be a stuffing that sticks together when pressed.  Let the stuffing cool down before the next step.
6. Make the roulade.  Unwrap the unseasoned side of the tempeh, leaving the plastic wrap on the bottom side.  Spread the stuffing evenly over the tempeh, leaving some room at the end to close the roll (see pics above).  Carefully lift the starting end with the plastic, squeezing slightly as you roll to keep its shape. Use the plastic to help roll- squeeze, then lift plastic, repeat. Don't worry if some of the tempeh crumbles off- just press it back in.  Wrap the finished roll tightly in plastic (you may need an additional piece).  Refrigerate while you roll out the pastry dough.
7. Roll out the dough.  You'll want it to be 1/4" thick, in one large piece, large enough to wrap your roll.  Unwrap and place your roulade in the middle of your pastry dough.  Wrap around lengthwise, then pinch together at each end.  Use any leftover dough to make decorative shapes to place at the ends and on top.
Put onto a prepared baking sheet, and bake at 375 F for about 30 minutes, or until golden. To give it some shine, you can brush on some soy creamer 10 minutes before finishing.

Allow to cool for about 10 minutes before slicing.  Hold firmly and use a sharp serrated knife.
Serve with your favorite gravy.
This was very hearty and tasty, and even meat-eating Mark said he'd be happy with this on his Thanksgiving plate!  You can prepare the roulade ahead of time, and wrap and bake on the day of. 


Nov 4, 2010

Vegan Pumpkin Cheesecake Pie


If Pumpkin Pie, loud-mouthed and full of sass married Cheesecake, narcissistic and demure, the result would be Pumpkin Cheesecake- but only if their relationship was dysfunctionally co-dependent. Now if they had a healthy complimentary relationship (Dr. Phil would be so proud), I'm thinking the result might be more like this.

Each having its own individuality, yet harmoniously coexisting.
Each supporting each other beautifully, and not having to compromise (you can have your crust, and I can have mine!)
And each savoring every moment together... awwww!
Ingredients:
1 Prepared pie crust, and cookie cutters
2 prepared graham cracker crusts, room temperature
Pumpkin Pie Filling:
3 C. pumpkin puree
2 1/2 C. sugar
2 T. cornstarch
3/4 tsp. ground nutmeg
1 tsp. dried ground ginger
1 T. ground cinnamon
1/2 tsp. salt
2 C. soymilk
1 C. soy creamer
2 tsp. agar powder
Cheesecake:
2 packages tofutti cream cheese
2 packages mori nu extra firm tofu
1/4 C. cornstarch
1 1/2 C. powdered sugar
4 tsp. vanilla extract

Spinz:
In a 9" spring form pan, line the bottom with parchment by tracing and cutting out a circle. Press the graham cracker crusts into the bottom and up the sides, making a 1/4" thick crust all the way around. Put it in the fridge until ready to fill.

Prepare the pumpkin filling: heat the soymilk and agar in a saucepan until agar dissolves. Put all other ingredients into a large blender (I used my vitamix), add the soymilk agar mixture, and blend until very smooth.

Prepare the cheesecake filling: I put everything into my food processor and blended until smooth.

Layering the pie: Start with pouring in half the cheesecake filling, then half the pumpkin, and repeat. Make sure to spread the layers to the edges.

Pie crust topping: Roll out the dough until it's about 1/4" thick. Cut out cookie cutter shapes and place on top of pie.

Bake: 350 degrees F for about 30 minutes. Let cool and chill before releasing from the pan. Before releasing, cut around the edges with a knife. If you don't want to serve it from the pan (bottom), add a piece of parchment on the bottom before adding the graham cracker crust.

Nov 2, 2010

Faux Rocks and Paper Mache

No, this is not a post about food... BUT, since most foodies are pretty crafty (with their recipes), and love to find interesting ways to recycle (who doesn't?), I thought this would be a post of interest. It was certainly interesting to me!

A while back, we decided to redo our front and back yards. Good friend and housemate, Mark helped to make this long overdue project a reality last week. A large cement truck was involved, and at the end of the day, we had a beautiful front patio and a lovely sunken back patio. After smoothing everything out, Mark had the ingenious idea to use the leftovers to make two large concrete "boulders."

These remarkably real looking boulders were made simply by building a mound of dirt, covering the mound with concrete, then smoothing out the concrete and adding cracks and texture with a small trowel. Powdered concrete dye was added during the sculpting process to add some color. Pretty cool, huh?


Rocks and Boulders made of Concrete
Mark works on smoothing out his concrete rock (our backyard patio in the background)


Me and My Rock
Side view of my rock
The other project involved the nostalgic childhood art of paper mache. Every Halloween, we do something special for the kids in the neighborhood (probably because we don't have any of our own). We usually decorate the front entrance with a scary tunnel and show movies on our huge projection screen that we use in our DJ performances, as well as some of our lighting effects. It's become a Halloween tradition, and something our neighborhood looks forward to every year. Of course, we always want to outdo ourselves- but I hate to spend a ton of money on decorations! So this year, with some trepidation, I decided to make some of my own.

Once I got the hang of it, it was a pretty simple process. First, build your form, making sure it's bound tightly with tape or string. Then mix 1/2 cup of flour and 2 tablespoons of salt, and about 2 cups of water, and simmer on the stove until "gluey." Then add ground up paper until you get the consistency you want- sticky but not sticking to your fingers too much. You can also use dryer lint, among other things.

Paper Mache Characters
Tree face made with flour, water, salt, recycled paper, dirt, and pebbles for eyes
Made "spookier" with uplighting and tombstones!


Harry Potter Mandrake Plant made with a stuffed onion bag, masking tape, and branches from an old plastic plant

Adding paper mache made with flour, water, salt, and recycled brown paper bags
Crying Mandrake- the finished product! I used a little black acrylic paint to accentuate the face and wrinkles.
On Halloween night- I  used a little voice recorder (you can see it behind the middle plant) to play the screaming sounds that I recorded directly from Harry Potter and the Chamber of Secrets, and put it on auto-loop with the volume on high.  The Mandrakes are sitting on top of scrunched up bags with potting soil to fill in and around the tops.
I also made Harry Potter's Dobby with plastic shopping bags, cardboard, and masking tape
Using the same technique as the Mandrakes, but I used recycled white copy paper (junk mail, old bills, etc.), which turned out gray in color
The face was painted with black, white, and yellow acrylic paint.  I then cut the sleeves and neck off an old white T-shirt and tied it onto his shoulders.  I originally wanted to have him hanging from a tree branch (thus the arm being up), but the tree was trimmed, so he got to sit in a chair, looking light a student raising his arm to answer a question LOL!
Teo gets into the spirit, and tries on Mike's SF Giants Panda Hat. They won that night, and became THE WORLD SERIES 2010 CHAMPIONS!!!
Overall, Halloween was a great success, with over 150 kids coming through!  We showed Harry Potter and the Half-Blood Prince on the big screen in front of our house, which drew some kids to stop and watch.  The front entrance to our house was converted into a tunnel with fog and lighting effects from our DJ business, as well as my props. 
Entrance to the tunnel on the left, big movie screen on the right, and we had large fire lights in each window to make the house look like it had eyes!
Entering the tunnel, which wrapped around to the left
And, here are our beautiful pumpkins that we got from our neighbor, Garry, who works at the Veg Crops Dept at UC Davis.  
We're so fortunate to have a neighbor like Garry, who provides us with free pumpkins every year!
"Giant Rat and Pumpkin Cat" and "Alien Eyeball Pumpkin" (with glowing eyeball lights!)
Mark's Pumpkin Castle, made with his Dremel carving tools... COOL!
 Special thanks to everyone who helped!  ... Now, on to Thanksgiving!