Oct 23, 2010

Savory Halloween Treats

I love Halloween.  Demonic worshippers and the psychotically-disturbed aside, it seems to be a holiday that is often confused with the glorification of violence and evil.  On the contrary, I think it celebrates our triumph over FEAR.  For once, we look at fear in a different way, and make light of it.  It's as if we take time once a year to shake off our fearful inhibitions to not only examine them, but to laugh at them.  How silly are we to be afraid of all the things that we're afraid of on a daily basis?  Come on, do you think people are really going over to the Dark Side, if they dress up as a prickly demonic half-vampire, half-werewolf, brain-sucking alien? [insert Darth Vader's breathing here]  If anything, it shows how wonderful it is that we DON'T live in a world where a creature like that exists, and I don't think anyone would ever, ever, want to be one (well, maybe- if it becomes sexy like vampires). 


The other side of Halloween, which I LOVE, is how it encourages us to be creative- to tap into that childlike wonder of the world of Pretend.  Something adults are mostly discouraged from expressing, due to and an overwhelming fear of being sent to the psycho ward, or worse yet- defriended on Facebook. It is perhaps the only socially-acceptable day of the year when we get to find out what it's like to be Robert Englund.

On Halloween, nothing is as it might seem, and we allow ourselves to walk around in someone (or something) else's shoes for a change.  To me, nothing is more irresistibly delicious than to be frightened without danger.  Call me twisted, but I think a zillion people in costume this year will agree with me!  

Here's some clever ways to dress up your food too.


This is simply store-bought puff pastry (I used a quarter of a sheet per coffin and they turned out to be about 4 inches long) that is cut into coffin shapes and scored with a paring knife.  The weight of the asparagus keeps the center from puffing, thus creating coffin walls!  I baked them at 400 degrees for about 10 minutes, and removed the asparagus (saving for later) from the coffins to let the centers sink down and cool.  I then spread a roasted garlic cream cheese to line the coffins, and cut and arranged the cooked "asparagus bones" to make skeletons... delicious and creepy at the same time!
Asparagus Skeletons with Roasted Garlic Tofutti Cream Cheese in a Puff Pastry Coffin

Deep Fried Wonton Ghosts with an Asian Tempeh Filling
This is just a store bought wonton skin- yes I was lucky to find a vegan one at an Asian market! The brand is called Myojo, but I couldn't find it online to order...boo.  I love the light crispness of these skins when fried.  They're pretty much just flour and water, so you could try to make them, but the key is to get them super thin which is a pain to do by hand. Maybe it could be done with a pasta maker.  The filling consisted of tempeh, carrot, onion, green onion, and garlic, which were minced in a food processor, then sauteed in a little oil with a few slices of ginger (later removed).  I then added some soy sauce and a cup of water to reduce.  I could've eaten a whole plate of these!  And, they're great boiled if you want to make Ghost Soup (evil laugh)!
Depending on how you fry them, you can also get some of these to stand straight up!
Lastly, just dot on the faces with the end of a skewer or toothpick dipped in Hoisin sauce.  The middle one is made with Siracha sauce (I like mine spicy). 


...Now I gotta get my pumpkins ready!!

Oct 17, 2010

Lemon Flavored Candy Corn


Prefer your candy without corn syrup, gelatin, eggs, beeswax, or artificial color? Why not make your own? Add your own flavorings to make this old classic an updated favorite!

To tell you the truth, candy corn was never one of my favorites.  In fact, I would go out of my way to avoid them as a kid, in favor of more exotic flavors.  I think you either love them or hate them.  The one saving grace is their undeniable cuteness, with those brightly tri-colored, trianglular shapes- so indicative of Fall and of course, Halloween.

A Little History
Did you know that candy corn was invented in the 1880's?  It was meant to mimic kernels of dried corn, and became widely popular due to its revolutionary tri-colored look.  The candies were made by hand with large vats, and the candy mixture was then poured into cornstarch molds in three stages to form the colors.  Today, they're still made with cornstarch molds, but automated machines crank out more than 20 million pounds that are sold annually!


Vegan Lemon Candy Corn
Note: To make traditional vanilla flavored candy corn, just omit the lemon. Experiment with other extracts to make variations of your own.

Ingredients:
1/4 C. Earth Balance Margarine*
1 C. sugar
3/4 C. brown rice syrup
1 tsp. vanilla extract
1 tsp. lemon extract
1 tsp. lemon juice
2 1/2 C. powdered sugar
1/3 C. soymilk powder
1/4 tsp. salt

For coloring:
Yellow: 1/4 tsp. tumeric
Orange: 1/4 tsp. tumeric + 2 tsp. beet juice (from canned beets)

Spinz:
You can make these any size you like, and if you get tired of making candy corn, it makes a good fondant for cupcakes or to make other shapes (a lot like playdoh).  

*These turned out a little on the soft side, so next time I might reduce the amount of margarine.  For fondant, it's perfect.  
I'm pretty sure this makes over a pound of candy- pretty time consuming by yourself, so make it a fun project to do with friends or kids!
Sift together the powdered sugar, soymilk powder, and salt in a bowl and set aside.  Heat margarine, sugar, brown rice syrup, extracts, and lemon juice in a saucepan, and stir until boiling and frothy.
Take saucepan off the heat, and add the dry mixture until well incorporated (a few lumps are ok).
Using separate bowls, divide the mixture into half, then divide one of the halves into half (to make three dough balls, one twice as large as the others).  Note: You can make equal parts if you like, but you'll need to adjust the coloring,  Into the large dough ball, add the beet juice and tumeric to make it orange.  It won't be bright orange, so if you want more vibrant color, add food coloring if you must.  Also add 1-2 T. of additional powdered sugar.  To one of the smaller dough balls, add tumeric to make it yellow (don't worry, you won't taste any of these). When cooled enough to handle, knead each one until smooth and color is even.  If it's too sticky, you can add a little powdered sugar, but not so much that it won't stick at all. If it's too dry, add a few drops of water.
Now you're ready to roll!  Spread a VERY light layer of powdered sugar onto your flat work surface.  Make ropes of equal thickness of the white and yellow, and a larger rope of the orange (for the middle).  Press the ropes together gently, then lightly roll the top with a rolling pin to flatten a bit and to further press together.  Then cut into triangles as shown above.
Finally, mold corners with fingers if desired.  Place them in a single layer on parchment or wax paper, and let dry.  DO NOT pile them up until they're dry, or they will stick together! These were deliciously lemony, with a good chewy texture and shiny outer shell.
I got bored with making candy corn, so I made myself a Fall Sweater... 
have fun with it!

Oct 10, 2010

10-10-10, A Perfect Day

In the wake of a busy life, it's good to slow down sometimes and contemplate our existence in this world. We have a tendency to rush around, make deadlines, scrutinize everything, and strive to be ...perfect.

A wise man once told me that it isn't perfection that we should be focusing on, but progress.

Perfection leads to self doubt, which leads to anxiety, which leads to defensiveness, which breeds hostility towards oneself, and the world- all while chasing something that simply doesn't exist (at least not for very long).

Progress is creativity expressed.
It is an open mind...
                                      a feeling of freedom...
                                                                                   a journey with
many
                  possible
                                     roads.

So on this day of "perfect 10's," let's sit down with ourselves, our friends and family, and celebrate how far we have come. Let's think about how we can contribute to a world obsessed with perfection, and coax a more relaxed smile- a lossening of the butt cheeks. Let's not take our causes so seriously, that we end up turning our backs to those around us. Let's not be so afraid that we deny the truth that's on our doorsteps. Let's be open to consideration, to communication, ... to progress.

Because nobody's perfect.

This post is dedicated to my neighbor, Larry -R.I.P. We miss you!

Oct 9, 2010

Build Your Own Lightbox for Food Photography, and Mimic Natural Light!


Using a lightbox to photograph your food is great when the sun's not cooperating. It's inexpensive, fun, helpful, and could improve the look of your pics. My one pet peeve about taking pictures of my food, is getting it ready to photograph before the sun goes down! Natural lighting is generally thought to be the best for photography, but I do a lot of my cooking in the evenings, and I'm not a morning person (big surprise!). Also, it's getting harder as the days get shorter and the cloudy Fall and Winter days lie ahead.

Whether you have a DSLR or a simple point-and-shoot, taking pictures with artificial light can be daunting, to say the least. Too much direct light, and you get an awful irradiated, shadowy look. Not enough light, and you get dull looking food- either way, not so appetizing!

"Bad Apples:" Not enough lighting (left), and harsh direct flash (right)

The next challenge for Project Food Blog involves photography. Unfortunately, I didn't make it through, but I was psyched to learn more about photographing food and how to improve my pics, so I decided to go ahead and build my own lightbox. By the way, this competition was amazing- I learned a lot, met a lot of talented bloggers, gained a good number of followers, and nearly tripled my page views! I highly recommend any blogger to enter if they hold this next year, even if you don't think you can do all the challenges- what a great experience!

Materials

U-connector, T-connector, both used together to form a corner

Here's what you'll need to make this lightbox. Note: others have made them out of a cardboard box and tissue or tracing paper, and I read of someone using an Ikea laundry stand that was purchased for $7. I happened to have most of the materials laying around the house already- no, we're not hoarders, but we do have an awful lot of crap.

Sizes may vary, but mine was about 25" wide, 25" deep, and 37" tall.

-pvc pipe (10 pieces, cut to desired size) -you could probably get someone at the hardware store to cut them.
-pvc corner fittings (8 "T" connectors and 4 "U" connectors)
-one roll of white poster paper (I used a 24" wide roll from OfficeMax for @10 bucks)
-one twin flat white sheet, or similar (I used a non-shiny white painter's tarp), cut into appropriate sizes to cover the sides, top, and front (optional)
-white foam core piece for bottom (optional).
-one roll of sticky velcro, cut into multiple pieces to hold the sheet
-simple shop lamps with clamps (at least 3), plus any household lamps you can use.
-light bulbs for lamps (I used 60 watt 5000k daylight fluorescent bulbs with an output of 800 lumens). I had 8 bulbs going, and I could probably add a few more.

Assembly


This is how it looks put together. I didn't bother gluing anything, so it can be easily disassembled. Make sure you measure carefully before you cut. The pieces that I added under the front poles are there because I made mine a little too big for my table- make sure to get the size right for the space your going to put it on! I ended up leaving it this way because the size would be perfect for a standard rectanglular table, if I decided to move it to another location.

Sides measured, cut, then applied to the frame with sticky velcro; roll of paper strung over rear top bar
I cut the sticky velcro into small squares, and used them to attach the "walls" to the frame. The roll of poster paper was strung over the rear top bar and brought to the front to create a seamless white background.

Placement of Lighting

You'll want to play with the placement of the lights you have. Make sure to light from both sides if possible, one on top, and one pointing towards the back wall. Note: all lights should be adjustable, as you'll have to play around with the angles to get the lighting you want.

Options to Improve Lighting

Roughly constructed bounce card made of foam core

Make your own "bounce card" or "fill card" to reflect more light onto your object. All you need is some white foam core, poster board, or cardboard covered with white paper.

A subtle difference, but the bounce card brightened the front of the apple and reduced shadows.
Mimic Natural Sunlight

A hole cut into a side wall will allow some direct light, giving a sunlight effect.

Cut a small slit into a side wall, and shine a light through the hole and onto the object, so the light goes through the fabric, but also gets partially diffused too. Make adjustments and use fill cards as necessary.

Artificial Sunlight Effect (raw)
Same picture after contrast was adjusted in a photo processing program (I used Gimp), although I think the collard greens look a little too dark! Could use more adjustment.
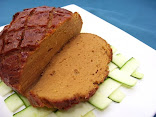
Taken earlier with natural light (raw)

Other Helpful Tips
Composition is important too. Think about things like:
-Does the food look balanced on the plate (i.e. colors, textures, foreground/background, etc.)
-Do accessories distract or add to the picture? Background as well.
-Does the food look like it should (i.e. sauces should look shiny, mashed potatoes should look fluffy, overall should look fresh, etc.)

Use a tripod if you can, to reduce shaking.

Also, learn how to process pics to adjust size, dpi, color, brightness, contrast, etc., by using a program such as Photoshop. I use Gimp, which is a simpler version (example above).

I'm still pretty new to this, and I'm sure some of you are pros- have any tips to add? Let us all know in comments, and thanks for sharing!

Oct 3, 2010

PFB #3: Fantasy Dinner Party


lux·u·ry n. 1. An object, service, or experience that is both out of the ordinary and conducive to joy and pleasure.  ...What could be more luxurious than a dinner party out of one's imagination?

You are Invited to  
My Fantasy Luxury Dinner Party!
Play along with me?

The Theme
Top Iron Chef Masters, Judges' Table
It is a tranquil evening, unseasonably moderate for early October.  You are seated at a beautiful candle-lit table setting for eight, on a elegant stone terrace that overlooks an incredible ocean sunset.  One by one, guests start to arrive, and seated amongst you are some intriguingly friendly faces that you don't know, as well as some you do!  In the background, a soft yet lively arrangement of music plays, and just as you have finished taking in the view and thoughts start to wander, in walks myself, and...
   
The Chefs!

Their Challenge
As the host, I reveal that they must each create a flavorful and exotic three-course meal for the 8 guest judges seated here tonight.

Surprise Twist
"But there is a twist," I add, in my best Colicchio impersonation.  
"Your dishes [dramatic pause]... must be vegan
[close-up of the chefs' faces: Morimoto- no change; Bayless- slight, but friendly smirk; Cora- closes her eyes with slight irritation, but quickly looks up with a steel-like determination]
...As master chefs, this will be a challenge- but not one you can't handle!"

The Guests
I love an intimate table of people sharing the same conversation.  Too many, and you lose some of that magic.  Close your eyes and imagine all of your favorite people, from present and/or past.  Now narrow it down to 4 people.

My Picks:
1)  Mike- a.k.a. DJ Destiny, husband extraordinaire, lover of all things fun and creative, wit like a whip, sushi connoisseur, and can play a wicked set on the DJ decks if I ask.
2)  Cee- Best friend, expert dietician (registered!), foodie with a very discerning palette, chocolate lover, expert baker of cupcakes and bubble bread.
3) Mark- a.k.a. MC Storm, Brother from another mother, class clown, owner of two restaurants, Ex-Coordinator of Hard Rock Cafe Marketing and Entertainment (US), and extreme foodie from England.
4) You, and all your wonderfulness!


Celebrity Guests
(It's a fantasy, right?)... Now think of 2 people that you've never met, but would love to invite to this table.  Would it be a famous chef?  Oprah?  Robin Williams?  President Obama?

My Picks:
1) Ellen Degeneres- will definitely write about this on Twitter, and would be the first to get up and dance!
2) Betty White- will sit there and be Betty White, who could complain about that?
Plus, they're both extremely funny, lovable, will appreciate the veg menu, and love animals... which leads to my next guest.

Special Celebrity Guest
One more spot is reserved for a famous fictional character.  Again, why not?  It's a fantasy!

My Pick:
Scooby-Doo- I just love a dog who can speak human in a doggy accent, and besides, he's a lovable character with an infectious laugh and a voracious stoner-like appetite (just gotta make sure he'll keep his paws off everyone else's plates- hehehehehehe!).  

... Now cue music, and insert commercial break for Buick Lacrosse and FoodBuzz.com (shamless plugs)

Now, its time to watch the chefs prepare our meals in Kitchen Stadium (which is conveniently located just inside the terrace).  The incredible aromas fill the air, as Alton Brown adds his usual colorful commentary and the Chairman does back- flips off one of the stages.
The Matrix Lady's voice finally counts down from 10, as the chefs and their helpers scurry around for last-second plating!  "10..9..8..7..6..5..4..3..2..1.." [unnecessarily loud air horn goes off] The chefs raise their arms quickly, as if being held up by muggers, marking the end of the battle.   
 "And now, to the Judges' Table!" I yell enthusiastically.


Appetizer Round
"Please describe your point of view, and what you have made for us." 


Rick Bayless's Original:  Tamal de Pato
Cat Cora's Original:  Greek Style Nachos
Main Course Round

Morimoto's Original: Sushi Platter and Shikaimaki Sushi
Cat Cora's Original: Sweet Corn Risotto with Herbs de Provence
Dessert Round


Rick Bayless's Churros and Mexican Hot Chocolate -Churro Recipe


Reactions from Judges' Table


"These dishes were so exotic, I'm gonna Twitter my fans and ask them if they can identify what was on my plate- first to get it right will win a Buick!"


"I haven't had vegetables this good since that time I was a guest star on Gilligan's Island!"


"I ROVE regetables!  Even more than Scooby-Snacks! Hehehehehehehe!"


As judges, no one could pick a clear winner, as every dish was beyond perfection, dream-like even.  We all looked at each other for a moment, bellies warm, backs slouched in our seats, each of us in our own state of content euphoria.  "Should we make them do a Breakfast Round tomorrow morning?" one clever member sluggishly offered.  That apparently sounded good to everyone, as we all grunted sleepily in approval.  

Who would you pick as the winner?  Leave a comment and let me know. I'll be sure to read it tomorrow... zzzzzzzzzzzzzzzzzzzzzz

If you liked this post, you can vote for me here.

Disclaimer: VegSpinz in no way claims that any of the above quotes are real or a true reflection of any person's words or character. This is a fictional work, based on the author's own quirky interpretations.